Chapter 5: SPECIFIC ONTOLOGIES
In this chapter we will introduce two instances of Ontology. We developed them following the previous chapter framework. As already stated, in the § 2.3 Limitations, some aspects like for example Control, Economical factors have been neglected. Our main goal, in fact, is to show the logical chain of relations that leads from the product requirements to the Assembly System requirements and therefore to the choice and the setting of adequate modules.
Every single product belongs to a Class of Product. A Class of Product is an homogeneous block of products: all the products of a Class, in fact, need the same kind of processes to be assembled. This definition is useful to show an other important strong point of a
process-oriented Ontology. The processes that you define for a single product, are valuable for the
whole class. For this reason, it is possible to state that the following Specific Ontologies refer to a Class of Product.
5.1 Washing Machine Handles Specific Ontology
Both the handle and the Electric Valve Group belong to an Electrolux washing machine. This feature adds value to our test-case because of the nearness with real situations.
5.1.1 Processes
A first glance to the Product requirements reveals for sure that there are no needs of manufacturing processes during the assembly so it is possible to ignore the “Machining Processes” .
Fig.124. Processes in Electrolux Ontology
The picture above provides an overview of the high levels of Process in our general Ontology. The first step to make a specific ontology for a Class of Product is to select all the processes involved in the assembly cycles. This section of the ontology is very relevant because of it contain all the information, the whole Know-how (of the company) about the specific assembly cycle. For these reasons in order to have only the valuable input it is necessary to choose only the worth processes.
The handle is a very simple product, and we examined only the “core” of the whole cycle. The features of our test-case lead us in the Joining domain. We do not need specific Assisting
Function or Fixating Function, in fact all the components can be fitted without glue or particular welding processes. Moreover we have not any screws or rivets.
Since that we are putting the focus on the inside of the cell, even the Handling and Logistics processes are out of our work. In general, the whole Auxiliary super-class could be neglected (we did not deal with Quality, Finalisation and Preparation aspects).
On the other hand, the Placing functions are very important for such a cycle, because the assembly is actually obtained by just Insertion processes.
Fig. 125. Placing Function
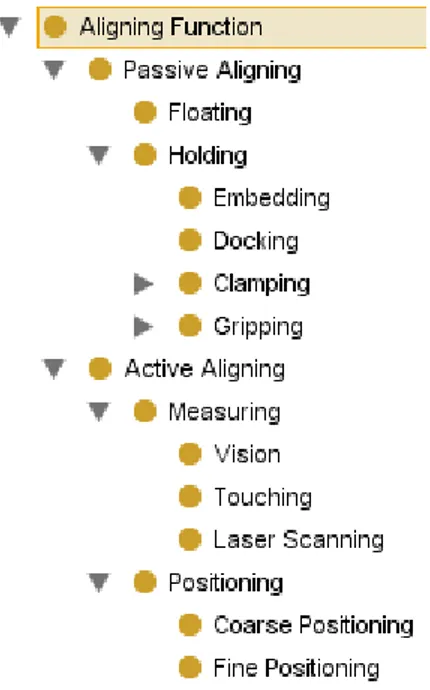
Another relevant section of the ontology is the Aligning Function, especially the Passive Aligning. In the handle, in fact, it is necessary to align the holes of the Plastic Handle and of Latch-Spring, in order to insert the Pin.
5.1.2 Activities
As already explained in the chapter number 3, the activity are hierarchically organised (see § 3.5). To date this section of the ontology should be make by an expert in assembly. A set of Activity hierarchically organised could be called Taxonomy. In this work we are going to show the cycles for a single handle, but of course it is possible to widen the approach for a Batch of Handles.
A Task is an activity performed at the level of a cell (or sometimes a whole line). For the handle, of course, the task is:
“Assemble the Handle”
An Operation is an activity performed at the medium level of modules. In our test-case, we can consider the operations already mentioned in the Assembly Cycles:
“Assemble the Handle”
1. Snap fit of the Latch into the Spring.
2. Insertion of the sub-assembled “Latch-Spring” in the Plastic Handle.
3. Insertion of the Pin in the sub-assembled “Latch-Spring-Plastic Handle”.
Each operation is made by actions, that is the lower kind of activity (performed at the level of
“Assemble the Handle”
1. Snap fit of the Latch into the Spring.
1.1. Feed the Latch 1.2. Feed the Spring 1.3. Grab the Latch
1.4. Join Latch and Spring
2. Insertion of the sub-assembled “Latch-Spring” in the Plastic Handle.
2.1. Move the pallet with the Plastic handle in the work area 2.2. Insert the sub-assembled “Latch-Spring” in the Plastic Handle. 2.3. Align the sub-assembled
3. Insertion of the Pin in the sub-assembled “Latch-Spring-Plastic Handle”.
3.1. Feed the Pin 3.2. Change Gripper 3.3. Grab the Pin 3.4. Insert the Pin
3.5. Move the pallet out of the work area
5.1.3 Skills
The next step is one of the most important to make an useful ontology. Each action need one or more skills to be accomplished. Let’s examine them one by one.
Action
Skills
1 Feed the Latch Feed
2 Feed the Spring Feed
3 Grab the Latch Move and Grab (Pick and Place)
4 Join Latch and Spring Move
5 Move the Pallet with the Plastic Handle in the work
area Move and Hold
6 Insert the sub-assembled “Latch-Spring” in the
Plastic Handle Move
7 Align the sub-assembled Move
8 Feed the Pin Feed
9 Change Gripper Move and Store (Exchange Tool)
10 Grab the Pin Move and Grab
11 Insert the Pin Move
12 Move the pallet out of the work area Move and Hold
5.1.4 General Equipments
Once that the needed Skills have been established, it is possible to select adequate equipments. In this thesis, equipment means General Equipment, in other words all the possibilities offered by the market. Of course, also in this step, it is necessary to account of the Database of
EAS Modules already owned by the company.
Action
Skills
Equipment
1 Feed the Latch Feed Feeder 1
2 Feed the Spring Feed Feeder *
3 Grab the Latch Move and Grab (Pick and
Place) Robot and Gripper 1
4 Join Latch and Spring Move Robot
5
Move the Pallet with the Plastic Handle in the
work area
Move and Hold Conveyor 1and Fixture 1
6
Insert the sub-assembled “Latch-Spring” in the
Plastic Handle
Move Robot
7 Align the sub-assembled Move Robot and Gripper 1**
8 Feed the Pin Feed Feeder 2
9 Change Gripper Move and Store (Exchange Tool)
Robot and Gripper-warehouse
10 Grab the Pin Move and Grab Robot and Gripper 2
11 Insert the Pin Move Robot
12 Move the pallet out of
the work area Move and Hold Conveyor 1 and Fixture 1 Tab. 8
* The usual troubles in feeding springs suggest to use a “Conveyor 2” and a “Fixture 2” (instead of a very expensive Feeder) to deliver the spring with the exact orientation and position.
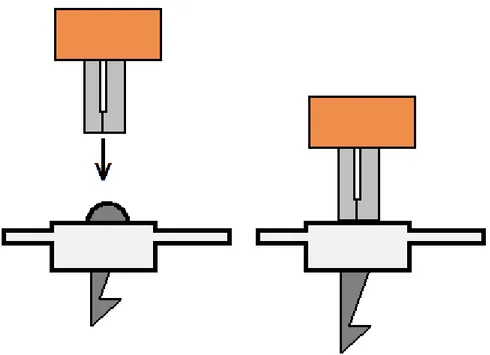
** The sub-assembled Latch-Spring needs to be pushed into the Plastic Handle to get the right alignment. Closing its finger, the Gripper 1 becomes able to accomplish such a task: this example shows an Emergent Behaviour of the Gripper 1.
Figure 127. Emergent Behaviour of the Gripper 1.
Summarizing, these are the necessary Equipments for the Cell:
• Robot • Conveyor • Fixture • Feeder 1 • Feeder 2 • Gripper 1 • Gripper 2 • Gripper-warehouse
5.2 Washing Machine Electric Valve Groups Specific Ontology
5.2.1 Processes
Even if, the Handle looks very different from the Electric Valve Group, basically the processes are the same we have shown above. Like in the previous analysis we can exclude all he Machining Processes. In this assembly processes we have not any particular Aligning to perform.
We need Oil to simplify the insertion of the tube in the Valve. Since that, this kind of process is not very common in Automatic Assembly Systems in this Cycle, we consider the Oil like a normal component, therefore it will be enough to Move the Tube into the Oil; the Oil anyway could be feeded also by an Assisting Function (like the glue or any other adhesive).
The focus is always on the assembly process and so we neglected the whole Auxiliary class; moreover, because of the nature of the product, there will not be any Fixating Function required.
5.2.2 Activities
The analysis of this assembly cycles, shows the possibility to use the Clamp Rings to grab the Tubes. This is an important consequence of the Emergent Behaviour. Not only do the Module integration produces Emergent Behaviour, but also the integration between Modules and the components.
This possibility allows to save money and time: neither specific grippers for the tubes, nor grippers exchange are necessary.
Following the same scheme introduced above, this is the Activity List relative to an Electric Valve Group:
“Assemble the Electric Valve Group”
1. Insert the first Tube in the Electric Valve.
1.1. Feed the Clamp Ring 1 1.2. Grab the Clamp Ring 1 1.3. Feed the Tube 1
1.4. Grab the Tube 1 1.5. Feed the Oil 1.6. Oil the Tube 1 end
1.7. Feed the Electric Valve Group 1.8. Insert the Tube
2. Fix the Tube with the first Clamp Ring.
2.1. Put the Clamp Ring 1 in its final position 2.2. Ungrab the Clamp Ring 1
3. Insert the second Tube in the Electric Valve.
3.1. Feed the Clamp Ring 2 3.2. Grab the Clamp Ring 2 3.3. Feed the Tube 2
3.4. Grab the Tube 2 3.5. Feed the Oil 3.6. Oil the Tube 2 end 3.7. Insert the Tube
4. Fix the Tube with the second Clamp Ring.
4.1. Put the Clamp Ring 2 in its final position 4.2. Ungrab the Clamp Ring 2
5.2.3 Skills
Action
Skills
1
Feed the Clamp Ring 1 Feed
2
Grab the Clamp Ring 1 Move and Grab (Pick and Place)
3
Feed the Tube 1 Feed
4
Grab the Tube 1 Move and Grab (Pick and Place)
5
Feed the Oil Feed
6
Oil the Tube 1 end Move
7
Feed the Electric Valve Group Move and Hold
8
Insert the Tube 1 Move
9
Put the Clamp Ring 1 in its final position Move
10
Ungrab the Clamp Ring 1 Grab
11 Feed the Clamp Ring 2
Feed
12
Grab the Clamp Ring 2 Move and Grab (Pick and Place)
13
Feed the Tube 2 Feed
14
Grab the Tube 2 Move and Grab (Pick and Place)
15
16
Oil the Tube 2 end Move
17
Insert the Tube 2 Move
18
Put the Clamp Ring 2 in its final position Move
19
Ungrab the Clamp Ring 2 Grab
20 Move the pallet out of the work area Move and Hold
5.2.4 General Equipments
Action
Skill
Equipment
1
Feed the Clamp Ring 1 Feed Feeder*
2
Grab the Clamp Ring 1 Move and Grab (Pick and
Place) Robot and Gripper 3
3
Feed the Tube 1 Feed Feeder 3
4
Grab the Tube 1 Move and Grab (Pick and
Place) Robot
5
Feed the Oil Feed Feeder 4
6
Oil the Tube 1 end Move Robot
7 Feed the Electric Valve
Group Move and Hold
Conveyor and Fixture 2
8
Insert the Tube 1 Move Robot
9 Put the Clamp Ring 1 in its
final position Move Robot
10
Ungrab the Clamp Ring 1 Grab Gripper 3
11 Feed the Clamp Ring 2
Feed Feeder*
12
Grab the Clamp Ring 2 Move and Grab (Pick and
Place) Robot and Gripper 3
13
Feed the Tube 2 Feed Feeder 5
14
Grab the Tube 2 Move and Grab (Pick and
Place) Robot
15
16
Oil the Tube 2 end Move Robot
17
Insert the Tube 2 Move Robot
18 Put the Clamp Ring 2 in its
final position Move Robot
19
Ungrab the Clamp Ring 2 Grab Gripper 3
20
Move the pallet out of the
work area Move and Hold Conveyor and Fixture
Tab.10
* The Clamp Ring will be delivered by a Conveyor and a suitable fixture for the same reasons we have seen above for the spring.
Summarizing, these are the necessary Equipments for the Cell:
• Robot • Conveyor • Fixture • Feeder 3 • Feeder 4 • Feeder 5 • Gripper 3