O4-A1 – Training materials
suitable for workshops
Erasmus+ for the immersion in 3D Printing of VET centres
Project Agreement Number: 2017-1-DE02-KA202-004159
This work is licensed under a
Creative Commons Attribution 4.0 International License
"The European Commission support for the production of this publication does not constitute an endorsement of the contents which reflects the views only of the authors, and the Commission cannot be held responsible for any use which may be made of the information contained therein."
Introduction
• Post-processing encompasses all of the actions that are performed after parts are removed from a 3D printer.
• Post-processing is a non-valued-added operation that increases overhead and imposes limits. It complicates the 3D printing workflow, adds expense and extends delivery time. • For the 3D printing labs, this is undesirable. It limits the
frequency of 3D printing use, the viable applications and the markets that are served.
Figure 1: Supported FDM print that requires additional post-processing. [1]
There are two categories of post-processing:
• Primary post-processing: It includes the mandatory steps
that must be performed on all parts to make them suitable for use in any application.
• Secondary post-processing: includes optional part finishing
that improves the aesthetics or function of the part. Most commonly, secondary post process includes sanding, filling, priming and painting. However, it can also include machining or plating, for example.
Post-processing operations may be automated, semi-automated or manual, and they can be either serial or batch processes.
Figure 2: A 3D printed part during post-processing process. [2]
Fused Deposition Modelling (FDM)
Cleanliness
The FDM process has the benefit that it doesn’t require cleaning. Unsupported finished parts are ready for use or further post-processing once the printing process is complete.
Supports on FDM parts need to be manually torn away or dissolved in water, depending on the support material. FDM machines can print with thicker layers and use a lower infill for the supports, which results in fast 3D prints and easier to remove supports.
This is ideal for applications like rapid prototyping, where it allows users to quickly evaluate success and move on to another print or project.
Minimize Supports
• The first step in dealing with supports actually comes before you start printing.
• The design process should try to minimize the need for supports. Then, in the slicer software, the orientation that uses less support structures should be chosen.
• The goal is to minimize the amount of supports, and subsequently the amount of work and time spent in post-processing.
Assess Your Material
• Different processing methods take different amounts of time and require different depending on the material and technology used.
Support removal process
The general FDM post-processing procedure for same material
supports includes:
• Removal of support structures (manual, serial)
• Light sanding to remove support structure remnants (manual, serial)
When using soluble support material, post-processing includes: • Gross support removal (manual, serial)
• Soak to dissolve supports (automated, batch)
• Pick out/cut off any undissolved remnants (manual, serial) • Rinse and dry (manual, serial)
Figure 3: Example of manual printing support removal. [1]
Although FDM technology delivers parts ready to use, the surface quality of the prints can be further improved.
For ABS the easiest and most effective way to smooth the surface of the part is with an acetone vapour.
Figure 4: ABS cleaning with acetone vapour . [3]
Post-processing ABS
What you will need:
1. Paper towels 2. Acetone 3. Tin foil
To smooth your print:
• Remove any excess material that you can from your print. • Place paper towels around all four sides of a plastic container. • In a well-ventilated area, sprinkle a small amount of acetone in
the bottom of the container, and cover the bottom of your container with tin foil.
• Place your 3D print in the container, and allow to sit for several hours – until the print has smoothed to your liking.
• Remove your print, and allow it to sit for several minutes to allow the acetone to evaporate off of your print.
• Your print is smoothed ready for display!
The acetone vapour alternative for PLA is hand polishing with Tetrahydrofuran (THF), as acetone does not dissolve PLA.
Figure 6: PLA polishing materials. [3]
Post-processing PLA
What you will need:
1. Non-latex gloves.
2. A lint-free, non-dyed polishing cloth.
To polish your prints:
• Remove any excess material that you can from your print. • Put on your non-latex gloves and locate your polishing cloth.
• In a well-ventilated area, dip the cloth in your THF, and polish your print like you would polish a shoe – circular motions work well here.
• SLS fuses powdered material with a laser, achieving parts with high level of accuracy and good strength. • SLS does not require supports, as the powder itself
keeps the part in place.
• Printed parts have a powdery, grainy finish. Post-processing of SLS parts is common practice.
• Coatings are also regularly added to SLS parts to improve the performance.
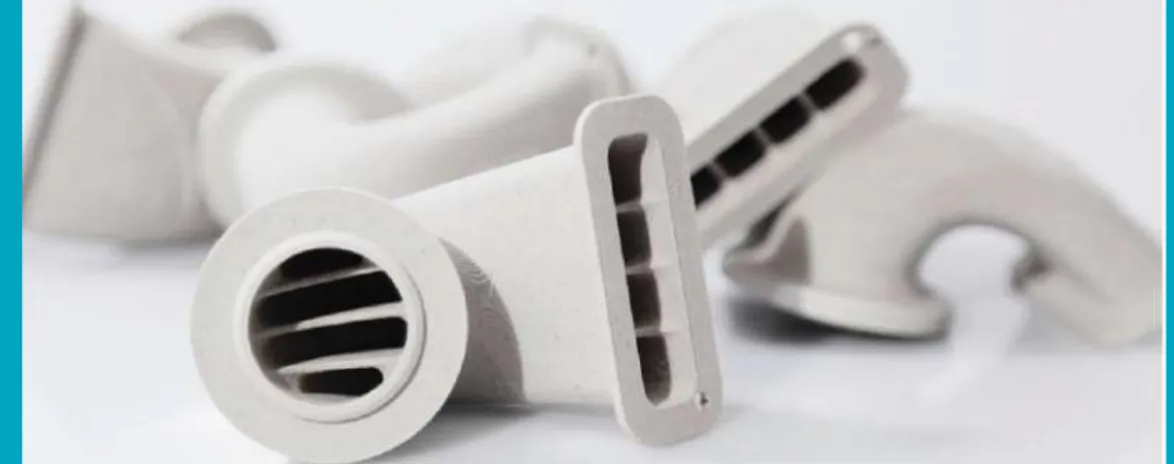
Figure 7: Air ducts built with SLS that incorporate inner features critical to the design, which would be impossible to execute easily via conventional means. [4]
• Finish: ★ ★ ☆ ☆ ☆ • Tolerances: ★ ★ ★ ★ ★
• Speed: ★ ★ ★ ★ ★
PROS CONS
All SLS parts come with this standard finish (unless
otherwise specified) Matte, grainy surface finish Good accuracy as overall
geometry is not altered
Limited colour options based on powder colour (typically white)
Lower cost
Standard finish
Because of the nature of the powder based fusion process, SLS standard finish is inherently rough, similar to a medium grit sandpaper.
One advantage is that this finish is very adequate for painting or lacquering.
PROS CONS
Excellent smooth surface Not suitable for delicate features
Multiple parts can be done at once
Removes sharp edges which can negatively affect part geometry
Media tumbled (vibro polish)
For a smoother surface texture, Nylon SLS parts can be polished in media tumblers or vibro machines.
Inside the tumbler, the part is mixed with small ceramic chips that vibrate against the object, gradually eroding the outer surface down to a polished finish.
This process does have a small effect on part dimensions and results in rounding sharp edges.
• Finish: ★ ★ ★ ★ ☆ • Tolerances: ★ ★ ★ ☆ ☆
• Speed: ★ ★ ★ ☆ ☆
Figure 8: SLS part being tumble/vibro polished. [4]
Dyeing
Dyeing is the fastest most cost effective method to colour SLS prints.
The porosity of SLS parts makes them ideal for dyeing. The part is immersed in a hot colour bath with a large range of colours available, which ensures full coverage of all internal and external surface. The dye only penetrates down to a depth of 0.5 mm, meaning continued wear to the surface will expose the original powder colour.
• Finish: ★ ★ ★ ☆ ☆ • Tolerances: ★ ★ ★ ★ ★
• Speed: ★ ★ ★ ★ ☆
PROS CONS
A large range of colours
available Dye penetration is only 0.5 mm deep Does not affect part
dimensions Does not result in a glossy finish Multiple parts can be dyed
at once
Cost effective compared to other colouring methods Good for complex
Stereolithography (SLA)
SLA 3D printers create chemical bonds by cross-linking photopolymers across layers out of resin, resulting in fully dense parts that are water and airtight.
SLA printing is considered the gold standard for smooth surface finish, with appearances comparable to traditional manufacturing methods like machining, injection molding, and extrusion, so generally the
Cleaning and curing
Once the print process is completed, the printed parts require rinsing in isopropyl alcohol (IPA) to remove any uncured resin from their surface. After rinsed parts dry, some materials require post-curing, a process which helps parts to reach their highest possible strength and stability.
Support removal
After drying and curing, supports can be easily removed. The remaining support marks should be sanded away for a clean finish.
Although the standard finish is generally good enough with SLA, the parts can easily be post-processed for specific applications, by machining, priming and painting.
Figure 9: Post-curing parts under UV light. [5]
Figure 10: Removing supports with flush cutters. [5]
[1] Formlabs White Paper FDM vs. SLA. 2019. Source: https://3d.formlabs.com/rs/060-UIG-504/images/FDM%20vs%20SLA.pdf
[2] Courtney Armstron (3D HUBS). Post processing for FDM printed parts. 2017. Source:
https://www.3dhubs.com/knowledge-base/post-processing-fdm-printed-parts
[3] Post Processing PLA and ABS Prints. 2017. Source: https://pinshape.com/blog/post-processing-your-pla-and-abs-prints/
[4] Stratasys Direct Manufacturing, 3D Printing Materials: Choosing the right material for your application, 2015.
[5] Post processing for SLA printed parts. 2017. Source:
https://www.3dhubs.com/knowledge-base/post-processing-sla-printed-parts
![Figure 2: A 3D printed part during post- post-processing process. [2]](https://thumb-eu.123doks.com/thumbv2/123dokorg/2912313.15388/5.1440.928.1406.182.543/figure-d-printed-post-post-processing-process.webp)
![Figure 3: Example of manual printing support removal. [1]](https://thumb-eu.123doks.com/thumbv2/123dokorg/2912313.15388/8.1440.929.1415.194.495/figure-example-manual-printing-support-removal.webp)

![Figure 6: PLA polishing materials. [3]](https://thumb-eu.123doks.com/thumbv2/123dokorg/2912313.15388/11.1440.144.1266.207.662/figure-pla-polishing-materials.webp)
![Figure 9: Post-curing parts under UV light. [5]](https://thumb-eu.123doks.com/thumbv2/123dokorg/2912313.15388/18.1440.963.1352.124.663/figure-post-curing-parts-uv-light.webp)
