IO1 – Methodology for defining 3D printing exercises suitable
for transversal education
-O1A5-
Develop methodology for creating
new didactic 3D printing design.
2
ERASMUS3D+
For the immersion in 3D printing of VET centres.
Project Agreement Number
2017-1-DE02-KA202-004159
This work is licensed under
https://creativecommons.org/licenses/by/4.0/
PARTICIPANT ORGANIZATIONS:
Disclaimer:
"The European Commission support for the production of this publication does not constitute an endorsement of the contents which reflects the views only of the authors, and the Commission cannot be held responsible for any use which may be made of the information contained therein."
Output Identification O1
Output Title IO1 – Methodology for defining 3D printing exercises suitable for transversal education Activity Title O1 – A5. Develop methodology for creating new didactic 3D printing design.
3
- O1A5 -
Develop methodology for creating new
didactic 3D printing designs.
4
INDEX
Introduction. ... 5
Some information about Additive Manufacturing or 3D printing. ... 6
Is 3D printing a recent technology? ... 6
What is Additive Manufacturing? ... 6
Production process in 3D printing: ... 7
How long do I need to print a 3D object? ... 7
Benefits of using 3D printing in education. ... 8
Visualization by touching and "grasping" of 3D models. ... 8
Visualization by working with the 3D model. ... 9
Arouse curiosity through the use of 3D printing in the classroom. ... 10
Latest technology in teaching. ... 10
Living inclusion by working with the 3D models... 11
TEMPLATE FOR THE DEFINITION OF THE EXERCISES ... 11
1. GENERIC ASPECTS OF THE EXERCISE ... 12
2. SPECIFICATION FOR TEACHING ... 15
3. TECHNICAL SPECIFICATIONS OF THE MODEL ... 16
Annex I.- Exercise: Fibonacci Spiral. ... 19
Pictures of the printing process of the Fibonacci Spiral exercise. ... 26
Annex II.- Exercise: Technical Drawing Views. ... 29
Pictures of the printing process of the Technical Drawing Views exercise. ... 35
Annexes Figures: Figure 1: Printing characteristics of the 3D Model. Fibonacci Spiral. ... 26
Figure 2: 3D printing process. Fibonacci Spiral. ... 27
Figure 3:3D Model finished. Fibonacci Spiral. ... 28
Figure 4:Model printed on the right. Post-processed Model on the left. ... 28
Figure 5: Design of the 3D Model. Technical Views. ... 35
Figure 6: Printing characteristics of the 3D Model. Technical views. ... 36
5
Introduction.
The aim of this document is to provide teachers with a tool, with which to define exercises in which 3D models have a key role. It is not necessary to have technical background of 3D printing or design, completing each of the points of the template will be enough for an expert in 3D design to shape the exercise defined. In addition to the "written" and "graphic" definition of the exercise, there is also a section for the teaching specifications, where it must be explained how the model can be used in the classroom and which are the benefits that both the teacher and the student will be able to obtain with its use.
Everything involved in the production process of a 3D object, from generating the idea to obtaining the printed piece, facilitates the learning of complex concepts for the student, providing him with new tools for the development of his creativity and for the understanding of the different subjects. The students can touch with their hands the concepts explained in class. This three-dimensional visualization improves the assimilation of concepts and captures the students' attention. We can also highlight that until now, students have had contact with subtractive manufacturing, where from a piece an object is created by removing material which implies the generation of residual material, this disappears with the additive manufacturing, since the final object is created layer by layer and only the material necessary to generate the desired volume is consumed, so that the waste material is zero.
We are living through a new industrial revolution, where "new" technologies play a key role in both the labor and social spheres. We have to prepare young people to face them, and for that, teachers with this knowledge are needed.
This document consists of the following points:
• Some information about additive manufacturing. • Benefits of using 3D printing in the classroom. • How to define 3D exercise?
o Teaching specifications o Technical specifications
6 • Annexes. Two defined exercises as examples.
Some information about Additive Manufacturing or 3D printing.
Is 3D printing a recent technology?
Additive manufacturing is not a recent technology, its birth dates back to the 80's and since then the advances in this technology have not stopped growing.
Curiously enough, the first person to fill out a patent on rapid prototyping technology was the Japanese lawyer Dr. Hideo Kodama, but the authorities denied his application for not delivering it on time, as he exceeded the deadline. The curious thing is that he was a patent attorney. This is why when looking for information on the origin of 3D printing the answer we get is that the first patent corresponds to the American Charles Hull in 1986, who invented the SLA machine (stereolithography), shortly after came other 3D printing processes such as SLS and FDM.
What is Additive Manufacturing?
Additive Manufacturing or 3D printing (commonly called) is a process that creates a physical object from a digital design. There are different 3D printing technologies and materials you can print with, but all are based on the same principle: a digital model is turned into a solid three-dimensional physical object by adding material layer by layer.
It is important to point out that Additive Manufacturing does not constitute a single technology but a set of manufacturing processes, very different from each other, that share three common characteristics:
1. They are manufacturing processes by addition of material to construct a solid three-dimensional object.
2. The object is constructed by superimposing successive layers of material. 3. The object is made from a digital 3D model.
They are called ADITIVE Manufacturing processes to differentiate them from conventional processes such us joining, forming and subtractive manufacturing.
7
Production process in 3D printing:
The production process of a 3D model can be summarized in the following steps:
The 3D models can be designed or scanned (in both cases specific software knowledge is required), or they can be downloaded from an internet platform, such as imaterialise, shapeways or thingiverse.
How long do I need to print a 3D object?
An important point to take into account is the printing time of a 3D object. Many times, we read on the internet that we can print an object in a short period of time, but this is ambiguous, as this process can take several hours. The "print time" depends on several factors, so it is difficult to specify the duration in a generic way. Some of the factors that affect the print time of a 3D object are:
The complexity of the part, the more complex the shape of the part, the more printing time it will require.
The infill of the model, according to the type of resistance that the piece needs, will have a type of filling, for example, a piece that has to be subjected to stress will need a higher percentage of infill and therefore more printing time. The type of infill ranges from 25% (simple infill) to 100% (fully solid).
The thickness of the walls, or what is the same the thickness of the contour of the piece, which in turn will depend on the nozzle of the printer.
Obtaining the 3D model. Exporting and repairing the STL file. Testing, orientation, distribution and G-Code.
Post-8 The height of the layer, this factor defines the finish of the piece, the thinner the layer the better the final finish. But, as more layers are needed to complete the part, more printing time will also be needed.
The printing speed, this parameter is also related to the definition or quality of printing, we can accelerate the printing process, but by doing so, in some cases the finish may not be the desired, especially in complex parts.
Most of these parameters are defined with software, and before pressing the print button on the printer, this software will give us information about the required print time and even the amount of material needed.
Benefits of using 3D printing in education.
3D printing is playing a very important role in the new industrial revolution called Industry 4.0 or connected industry, and its presence increases every day in more sectors of industry and knowledge. Therefore, equipping students with this type of technology, whose use is increasingly implemented, is very important to prepare them for the future.
3D printing, due to the possibilities that this technology offers, allows its integration into different topics. As an example of this you can see the annexes to this document.
The inclusion of 3D printing in the classroom helps students to increase the PTLS (Personal Learning and Thinking Skills), thus forming creative thinkers and reflective students, since students learn through practice. It's called "learning by doing".
In the following points some of the most important benefits of its application in the classroom are shown.
Visualization by touching and "grasping" of 3D models.
The high visualization of the mediated content is one of the biggest advantages of using 3D printing and especially the models in the classroom. The visual and/or haptic perception channel of the learners is particularly stimulated by using the 3D model.
9 The visualization can satisfy the following different aspects:
• Size relationships can be clarified on the object. An object can be printed in different sizes with a fixed scale, so that proportions become tangible.
• Small objects can be printed large, so that more details are visible even without a microscope or magnifying glass.
• Large objects can be scaled down so that you can bring the world into the classroom. You do not have to drive to the places, to get a three-dimensional idea and opposite to a picture, the objects are touchable.
• Objects that can not be considered a real object for a variety of reasons, become visible and/or touchable through a 3D model.
• A student can view complex structures, geometric shapes from all angles and get a more holistic vision.
Visualization by working with the 3D model.
Sustainable learning through a playful approach to working with the 3D model is promoted. Complex, even multi-part 3D models are suitable for the presentation of processes. The model becomes a working tool in the classroom. The learners make experience while working with the model and they can collect, gather and evaluate these experiences. If an object is printed in individual parts, which are then to be collapsed by the students, the benefits go beyond mere intuition. Students work with the model again. Students develop an understanding of building complex objects. Internal structures can be rebuilt and made visible. Students can follow the development process step by step and thus better understand.
Taking the 3D model as a casting mold represents another way of working with the technology or the model. 3D printing as a technique for the production of parts or individualized objects as well as templates for mass production.
10
Arouse curiosity through the use of 3D printing in the classroom.
Why do students learn quickly and often in a short time? Especially because they are curious. The curiosity has to be awakened among the learners in order to promote the willingness to learn and to consolidate knowledge in a sustainable way.
Printing of 3D models is a good way to arouse this curiosity among the learners.
Learners learn that the models were specially printed for them prior to class, that the idea for this model may have come from the teacher or even been developed with the learners. This subliminally increases respectful treatment and thus increases the willingness to learn. They were temporarily present when printing the 3D models, perhaps even accompanied the printing process. The learners have become curious and want to learn more about the technology. They want to produce themselves. They have their own ideas that they want to implement.
Promoting creative potential can be a success in the use of 3D printing in the classroom. According to the saying " You make your own luck".
Latest technology in teaching.
An understanding of a contemporary production workflow in many professions can be laid with the use of 3D printing. An increased use of this technique in the career development phase is desirable.
As students learn about the possibilities of 3D technology, they will also learn about the limitations and difficulties. They learn to judge and use techniques reflected.
A problem-based teaching approach can promote willingness to learn and motivation. It is necessary to look beyond one`s own nose, there adjacent themes play a role in the design of the object, the pressure of the object and the assessment in the application of the object. Once the foundation has been laid, the technology can be transferred to other areas. Such transfer performance can be another added benefit of 3D printing in the classroom.
11
Living inclusion by working with the 3D models.
3D model offers a special didactic benefit for visually impaired and blind persons. Text-based tasks are translated into 3D models, making them easier to understand; another access is possible. Described objects become tangible and can be experienced in a haptic way. The Braille font is a tactile font anyway. The integration of Braille font on models allows inclusion in education.
TEMPLATE FOR THE DEFINITION OF THE EXERCISES
DEFINITION OF THE EXERCISE
The definition of the exercise consists of three parts which are described below: 1) The first part refers to the generic aspects of the exercise to be defined. This section contains:
1.1 Information: Theme (What the model is about), Name and Subject (In which subjects the 3D model can be included).
1.2 3D Model.
1.2.1 Written definition of the model. 1.2.2 Graphic definition of the model.
1.2.3 Additional materials for a better description.
2) In the second part, it is specified how the model can be used in the classroom. In this part teaching specifications will be included.
12
1. GENERIC ASPECTS OF THE EXERCISE
1.1. Information. (This section refers to the general aspects of the exercise. It will be necessary to complete all the sections having in mind the goals you want to achieve with the 3D printing artefact.It is also important to identify the subject to which the object refers and the educational role that the model plays in it).
Exercise name: Here, you should specify the name of the exercise that may be different from the model name, for example: the name of the exercise can identify a goal that you are aiming for. Also, it may contain a specific technique used or a particular material or identify the subject to which it refers.
In this section it is also possible to use the same name that is included in the section concerning the model.
Model Name:
(could be the same as the exercise name)
The model name should identify the item you want to print.
It can refer to a proper name or a category. It could be the same as the exercise name.
Theme:
(Explanation of the use of the model)
You should include the use of the model and describe it; what is the main objective of the artefact and reason for which it is used in the classroom. Please, try to include as many details as possible to better explain what students can get from the use of the model. You can include multiple design themes, as many as the printed object can meet.
Specific subject:
(We can add more
possibilities in point 2 of this template)
You should put the name of the subject to which the exercise refers. For example: art, geography, history, technology, science, etc... It is important to identify only one area in this section. In point 2 of this template it will be possible to include other subjects to which the object, transversely, can refer to.
Number of pieces of which the model is composed:
When the exercise is made up of more than one piece, it will be necessary to indicate the number of pieces that represent the final exercise, for example, if the exercise is the representation of the solar system, we will have to indicate
13 that it is composed of 9 pieces (the sun and the 8 planets) and its 9 retainers (where they will be supported to prevent their sliding).
It is also possible that a single 3D model is made up of more than one piece, for example a 3D model of a simple car, can be formed by 4 wheels, two axes to connect the wheels and the body of the car or chassis, in this case we would have to indicate that the 3D model is composed of 7 pieces.
It is possible that the 3D model, either because of its shape or its size, needs to be divided into several parts for its correct printing and for the final result to have the desired appearance, this process will be done before the object is printed.
1.2. 3D Model (General characteristics of the object you want to print in 3D with graphic references such as sketches, images or videos that can explain in a better way what you would like to print and the objective to be achieved)
1.2.1. Written description
In this section, we have to describe the model aesthetically giving all the possible information so that the designer can have a first idea of what he has to design, for example, the number of pieces that make it up, the description of each of his pieces (shape), approximate / desired measurements of the assembly or its parts, colours...
Furthermore, a brief description should be made from an educational and didactic perspective. What is the model representing, why it was chosen, what is it for, in which ways it can be used during classroom lessons etc...
14 1.2.2. Graphic Definition of the 3D Model. (Technical draws, hand free sketch and renders) Here you have to insert hand free sketches, technical drawings and renders (when possible), to better explain the object to be printed in 3D both as a whole and in its different parts. It would be useful to have at least three views (front, side and top) and an exploded axonometric view in order to have a global vision of what you would like to represent.
You can size the objects to be represented and dimensioned with the same metric scale in all their components, in order to allow a comparison between each other. You can also explain through the drawings if there are components joined through technical joints, if there are parts that rotate, if these parts slide or are restricted in some way. You can highlight the internal and external details. Please use as many pages as necessary.
1.2.3. Additional materials for a better description.
In this page you can insert images, links with additional information, videos, graphics, infographics to better explain the exercise you would like to realise.
For each of the above-mentioned material that you will include in this section, it is necessary to provide the sources. Please, use as many pages as necessary.
15
2. SPECIFICATION FOR TEACHING
In this section you collect information on how and why to use the 3D model in the classroom, the advantages and benefits of its use it and if there are other subjects for which it can be used.
It is important to explain the goals that can be reached through the printing of an object in 3 dimensions. What will be the expected results and what the students and the school will achieve in terms of learning objectives.
a) How can this model be used in the classroom?
Describe in detail the use of the model printed in 3d in the classroom lesson. What is the didactic scope about the use the object developed and what goals are intended to be achieved through this type of 3Dprinted artefact. If the exercise consists of several 3D models, describe the use of each of them.
b) What benefits can be obtained with its use?
Describe the benefits that students can take from the use of 3D exercise in the classroom. Also describe the benefits related to both the disciplinary field and also the practical, sensory and recreational-social level.
c) Is there any other subject where this exercise can be located?
An exercise can incorporate many more subjects by relating transversal knowledge. In this section, it is necessary to list further subjects that can be addressed in addition to the main subject specified above.
16
3. TECHNICAL SPECIFICATIONS OF THE MODEL
Hereunder there are described the technical specifications to take into account when a 3D model is going to be defined, when it is going to be used in a certain exercise. Now, those technical specifications believed to define an exercise are named and described:
TECHNICAL SPECIFICATIONS
Technology Here, it must be specified the kind of 3D printing technology to be used. The main types are: FDM, SLA, SLS… However, most certainly, the technology to use, in the most of cases will be FDM, due his quality-price ratio of materials and machine.
If you have a printer, what model is it?
On this chapter the model and brand of the 3D printer must be
indicated, if the school has one. This 3D printer will be the one that will print the pieces and models of the defined exercise.
Material Now the kind of material to use in the model has to be specified. For FDM technology, most used materials are PLA and ABS. Although there are also other materials such as TPU, Nylon, PETG, etc.
PLA is very easy to print, very accurate and rigid, so it is one of the options more frequent for printing models. ABS is a bit more complicated to print because it tends to deform.
Colour (One piece one colour)
On this chapter the adequate colors for the pieces or models must be specified. It is highly recommended to choose just one color per piece (and for 3D job). For FDM technology, the 3D printer materials come in rolls, and they are of one unique color. If you want so, 3D printed pieces can be painted.
Suitable
dimensions for its use in the classroom (mm)
Here, it must be specified the necessary size of the object or model. You can indicate very general dimensions, such as length, height, width (x, y, z). Or it is also possible to give more specific dimensions, like diameters, thickness, or the size of more specific parts of the object. It is recommended to indicate the measures in millimeters. On this part it
17 is also convenient to consider the printing bed size. This will restrict the size of the object to print.
Should the piece be resistant or be subjected to stress?
On this chapter it must be indicated by means of a “yes” or a “no” if the object is going to be used in a way that it is necessary to be resistant. This will happen in some cases, such as when the piece is supposed to hold charges, forces, etc., for example. If you indicate “yes” on this chapter, the object will be printed with a greater infill percentage, for example, which will imply a greater printing time. If you indicate “no”, the model could be lighter, and it will be printer in less time.
Should it be printed during class, before or after?
It also must be specified if the object or objects must be printed during the class, before or after. This will impact on the necessary printing time. If it is necessary to print the object during the class, the printing time should be reduced. If the object can be printed before or after the lesson, the 3D printer can stay printing, and the printing time will not be important.
Do you have to paint the model?
In this part, it must be described if the model must be painted after being printed. If it is necessary, the filament color will be probably white, and the piece will be softly sanded. Even then, in this chapter, it is convenient to indicate the color or colors to paint the object.
Number of pieces of which the model is composed:
Sometimes, a single exercise may be composed by more than one piece. Here, this information must be indicated.
Ensemble type if necessary (slot, clip, screwed ...)
When a model is composed by several pieces, that must be ensembled, in this chapter it must be indicated which kind of assembling or union method is going to be used. For example: slot, clip, screw, pressure adjustments, etc. Most of the assembling for joining or connecting 3D printed pieces need some tolerances and features that must be taken into account when designing the piece.
18 Accuracy and definition required. (Quality) Low, mid or High.
Finally, the required quality of the printed part must be indicated by means of 3 levels: low, mid or high. The quality or accuracy of a 3D printed object, talking of FDM technology, can be reflected in the visual aspect, among others. If, for example, the piece is very tiny, or it has a lot of complex details, quality must be high. This will also impact on the printing time (the higher quality, the higher printing time). If the piece has simple geometry, with no details, with flat faces, etc., the needed quality will be mid or low.
Support material or post-processing.
Here we will indicate if it is necessary to remove the backing material in case the model needs it for 3D printing. We will also indicate if in order to obtain the final object it has to undergo post-processing.
19
Annex I.-
Exercise: Fibonacci Spiral.
1. GENERIC ASPECTS OF THE EXERCISE
1.1. Information.
Exercise name: Fibonacci’s spiral Model Name:
(could be the same as the exercise name)
Fibonacci’s spiral
Theme:
(Explanation of the use of the model)
The model will be used to foster students’ inquiry about the mathematical laws governing our universe. The model will support the student discovery of the golden ratio, from natural objects in our planet up to distant galaxies.
Specific subject:
(We can add more
possibilities in point 2 of this template)
Science
Number of pieces of which the model is composed:
12
1.2. 3D Model
1.2.1. Written description
The model is composed of 10 independent pieces. The first two pieces (the two smallest) will be a quarter of a circle with 1 cm size radius, the third will have the same shape but 2 cm of radius, the fourth 3 cm, the fifth 5 cm, and so on by continuing the Fibonacci sequence (1, 1, 2, 3, 5, 8, 13, 21) up to the last piece with size 21 cm. The pieces that will compose the spiral are contained and supported by a rectangular back support, also printed in 3D and divided into two halves. This has a recess of 7.5mm to better allow the positioning of each piece.
20 1.2.2. Graphic Definition of the 3D Model. (Insert technical or hand free sketch. Use as many pages as necessary)
1.2.3. Additional materials for a better description.
On this page you can insert pictures, links with additional information, videos…
For each of the documents that we insert in this section, the sources must be provided.
VIDEO: https://www.youtube.com/watch?v=SjSHVDfXHQ4 Source: https://www.google.it/search?q=fibonacci&source=lnms&tbm=isch&sa=X&ved=0ahU KEwjWuoOK3KjdAhWN6qQKHcARC9gQ_AUICigB&biw=1114&bih=506#imgrc=n4LueA RCdVsB4M:
24
2. SPECIFICATION FOR TEACHING
Here we will collect information on how to use the 3D model in the classroom, the benefits of its use and if there are other subjects where it can be used.
d) How can this model be used in the classroom?
The model will be used by the learners to explore the construction of the Fibonacci sequence and to build their own (even larger) spiral models.
e) What benefits can be obtained with its use?
The benefits are mostly related to the opportunity of a hands-on exploration of the model. The tactical sense, in addition to the optical one, and the practice of relating the different parts of the model by following specific geometrical rules will help the students to fit the shape of some natural objects into the Fibonacci spiral, stimulating the discussion with peers and the teacher about the golden ratio observed in nature.
f) Is there any other subject where this exercise can be located? Mathematics, Astronomy, Art.
3. TECHNICAL SPECIFICATIONS OF THE MODEL
With these specifications of the exercise, the necessary printing parameters for each 3D model will be extracted. (Infill, best orientation, support materials, walls thick, layer height…)
TECHNICAL SPECIFICATIONS
Technology FDM
25
Material PLA
Colour (One piece one colour) Pieces of spiral white Back Support Yellow Suitable dimensions for its use in the classroom
(mm) 380x248x17 mm (overall) Base, 4 pieces: 188x125x17 mm Piece no 1. r. 10X5 mm Piece no 2. r. 10X5 mm Piece no 3. r. 20X5 mm Piece no 4. r. 30X5 mm Piece no 5. r. 50X5 mm Piece no 6. r. 80X5 mm Piece no 7. r. 130X5 mm Piece no 8. r. 210X5 mm
Should the piece be resistant or be subjected to stress?
No
Should it be printed during class, before or after? Before or after the class
Do you have to paint the model? Yes, the pieces of spiral should be print with different colours. Number of pieces of which the model is composed: 12
Ensemble type if necessary (slot, clip, screwed ...) No
Accuracy and definition required. (Quality) Low, mid or High.
Pictures of the printing process of the Fibonacci Spiral exercise.
Figure 1: Printing characteristics of the 3D Model. Fibonacci Spiral.
27 Figure 2: 3D printing process. Fibonacci Spiral.
Figure 4:Model printed on the right. Post-processed Model on the left.
29
Annex II.-
Exercise: Technical Drawing Views.
1. GENERIC ASPECTS OF THE EXERCISE
1.1. Information.
Exercise name: Technical Views
Model Name: (could be the same as the exercise name) TechnicalViews_1 Theme: (Explanation of the use of the model)
Learning and practicing how to obtain technical views (top, front and side view) from 3 objects. It can also be used for practicing the dimensioning of views by measuring the pieces.
Specific subject:
(We can add more possibilities in point 2 of this template) Technology Number of pieces of which the model is composed:
3 (preferably per student)
1.2. 3D Model
1.2.1. Written description
The exercise is composed by 3 geometrical pieces with different shapes and difficulty levels:
• Piece 1, easy level • Piece 2, medium level • Piece 3, hard level
30 1.2.2. Graphic Definition of the 3D Model. (Insert technical or hand free sketch. Use as many pages as necessary)
31
Pieces together
1.2.3. Additional materials for a better description.
On this page you can insert pictures, links with additional information, videos…
For each of the documents that we insert in this section, the sources must be provided.
Piece 1
Piece 2
33
2. SPECIFICATION FOR TEACHING
Here we will collect information on how to use the 3D model in the classroom, the benefits of its use and if there are other subjects where it can be used.
g) How can this model be used in the classroom?
This model can be adapted for teaching different activities. The main aim is to teach the students how to obtain the technical views (top, front and side) of the 3 objects in the first year of their technology course.
In following courses, as obtaining technical views lessons are repeated, it might be suggested also to learn how to do the dimensioning of those views, with the possibility of measuring the pieces during the lesson.
These pieces can be modified by the teacher in order to adapt the difficulty of the exercises to the group of students (as far as he knows the basics of CAD designing).
Furthermore, it is suggested that higher courses students at engineering or technology subjects (when they learn about CAD programs and 3D designing) design and print their own new pieces for the lower courses students to work with.
h) What benefits can be obtained with its use?
The main benefit of this exercise is that teachers are able to instruct their students in technical views obtaining (which is quite abstract and sometimes a hard topic) by a very practical way.
Having the real solid object in front of the students and them being able to manipulate it conduct the lesson to a better understanding in a more simple and entertaining way.
i) Is there any other subject where this exercise can be located? - Technology, Engineering and Design.
34
3. TECHNICAL SPECIFICATIONS OF THE MODEL
With these specifications of the exercise, the necessary printing parameters for each 3D model will be extracted. (Infill, best orientation, support materials, walls thick, layer height…)
TECHNICAL SPECIFICATIONS
Technology FDM
If you have a printer, what model is it? Ultimaker 2
Material PLA
Colour (One piece one colour) Grey (any colour is possible)
Suitable dimensions for its use in the classroom
(mm) Piece 1: 80x60x40 Piece 2: 60x60x60
Piece 3: 80x80x80 Should the piece be resistant or be subjected to
stress? No
Should it be printed during class, before or after? Before
Do you have to paint the model? No
Number of pieces of which the model is composed: 3
Ensemble type if necessary (slot, clip, screwed ...) -
Accuracy and definition required. (Quality) Low, mid
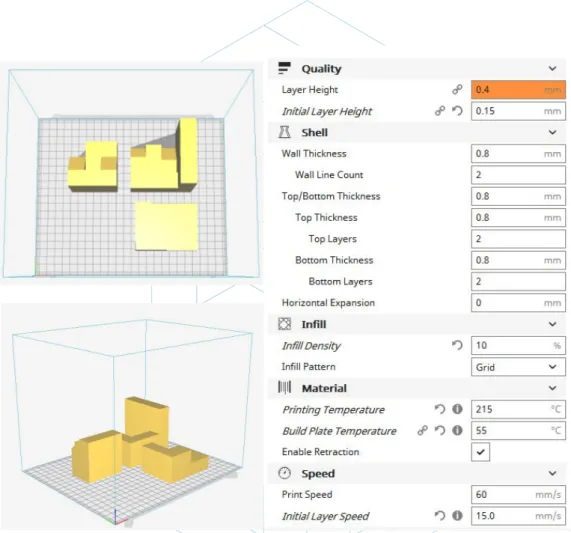
Pictures of the printing process of the Technical Drawing Views exercise.
36 Figure 6: Printing characteristics of the 3D Model. Technical views.