original article
CAD/CAM
TECHNOLOGIES IN THE
SURGICAL AND PROSTHETIC TREATMENT
OF THE EDENTULOUS PATIENT WITH
BIOMYMETIC INDIVIDUALIZED APPROACH
A. POZZI*, M. GARGARI**, A. BARLATTANI***
* DDS PhD, Private Practice in Rome, Italy
** University of Rome Tor Vergata, Department of Odontostomatological Sciences
*** MD DDS, Chief and Director Dental Degree & Department of Dentistry, University of Rome Tor Vergata
SUMMARY
CAD/CAM technologies in the surgical and prosthetic treatment of the edentulous patient with biomymetic individualized approach
Background: The advent of modern endosseous implant design and
improved surface technology has allowed the development of new restorative techniques that decrease patient’s total treatment time. Uti-lizing the latest scanning, CAD/CAM and manufacturing technolgies we are able to manufacture individualized dental restoration with high ac-curacy and a perfect precision of fit.
Materials and methods: This report describes the rehabilitation of a
completely edentulous patient utilizing a CT-based implant planning with computer-assisted surgical design, simultaneous CAD/CAM fabri-cation of a surgical template, a flapless surgical placement of the im-plants, and a prefabricated fixed complete denture for an immediately loaded restoration according to Nobel Biocare’s Teeth-in-an-Hour™ (Nobel Biocare Goteborg, Sweden) protocol.
This systematic approach to full mouth rehabilitation reduces the time necessary for an edentulous patient to go from severely atroph-ic alveolar support to implant retained prosthetatroph-ic restoration. These aspects of minimally invasive and simplified surgery, along with re-ducing the treatment time and postsurgical discomfort, are beneficial to the patient, and allowing for rehabilitation with the same level of success as in flap surgery.
Conclusion: The Teeth-in-an-Hour protocol is a unique solution made
possible by the Procera System. With the aid of the CT scans and a vir-tual planning software, a custom fabricated precision drill guide and a pre-manufactured prosthesis can be made before surgery. The execu-tion of implant placement is performed with a flapless procedure that re-sults in minimal surgical intervention. This rere-sults in a short and non-traumatic surgery with a minimum of postoperative complications, al-lowing the patient to leave the chair with a fixed prosthesis. Utilizing the latest scanning, CAD/CAM and manufacturing technologies the dental team is able to develop individualized zirconia full arch framework with high accuracy and precision of fit.
Key words: Nobel Guide, CAD/CAM technology, zirconia full arch framework.
RIASSUNTO
La tecnologia CAD/CAM nella riabilitazione implantoprotesica del paziente edentulo con un approccio biomimetico individualizzato
Background: l’introduzione di nuovi design implantari e di nuove
su-perfici finalizzate al miglioramento delle capacità osteoinduttive e d’integrazione delle fixture ha stimolato i clinici a sviluppare nuove procedure restaurative che aumentino il comfort del paziente e ridu-cano il tempo complessivo di trattamento. Utilizzando le ultime tec-niche di scansione, in associazione con la tecnologia CAD-CAM, siamo in grado di produrre restauri protesici individualizzati con un alto grado di accuratezza e con una perfetta precisione, anche nei casi di riabilitazioni complete.
Materiali e metodi: questo articolo descrive un protocollo di
trattamen-to per la riabilitazione implantare immediata delle arcate completamen-te edentule. Il protocollo Teeth-in-an-Hour (Procera Syscompletamen-tem, Nobel Bio-care) è una soluzione terapeutica unica, resa possibile da una piatta-forma di produzione che mette a disposizione del team implantoprote-sico, la tecnologia CAD/CAM nelle varie fasi di progettazione e realiz-zazione della riabilitazione su impianti. Il posizionamento dei pilastri im-plantari viene eseguito con una procedura chirurgica flapless mini-inva-siva; questo approccio conservativo risulta in una chirurgia atraumati-ca, di breve durata rispetto alle procedure convenzionali e pertanto il dolore e le complicanze locali nell’immediato post-operatorio (sangui-namento e gonfiore) sono minime, con grande beneficio per il pazien-te, garantendo le stesse percentuali di successo della chirurgia a cielo aperto. Il team implantoprotesico utilizzando la tecnologia CAD-CAM è in grado di progettare e realizzare la riabilitazione implantoprotesica con un elevato grado di precisione e di accuratezza chirurgico-protesi-ca. UtIlizzando le ultime tecniche di scansione tattile-meccanica, l’ela-borazione CAD/CAM e tecnologie di produzione e controllo di tipo in-dustriale, è possibile ottenere restauri in ossido zirconio estesi a tutta l’arcata dentaria con un alto grado di accuratezza e precisione.
Conclusioni: questo nuovo protocollo attraverso la pianificazione
computerizzata virtuale protesico-chirugica dell’implantologia e la realizzazione di strutture CAD/CAM estremamente precise ed accu-rate, semplifica le procedure operative necessarie alla riabilitazione delle arcate completamente edentule, facilitando il passaggio da una protesi totale insufficiente e scomoda per il paziente con grave rias-sorbimento osseo ad una riabilitazione fissa definitiva in circa 4 me-si di trattamento.
Parole chiave: Nobel Guide, tecnologia CAD/CAM, strutture estese in zirconio.
©
CIC
EDIZIONI
The advent of modern endosseous implant design and improved surface technology has allowed the development of new restorative techniques that decrease a patient’s total treatment time. Uti-lizing the latest scanning, CAD/CAM and manu-facturing technolgies we are able to manufacture individualized dental restoration with high accu-racy and a perfect precision of fit. According to the original Branemark protocol the time period for the osseointegration of an implant, prior to restoration, in preparation for loading was be-tween 3 and 6 months, depending on implant po-sition and bone quality (Branemark, 1983; Gaps-ki R., 2003). Changes in implant design and sur-face characteristics have led to the concept of early loading of implants, decreasing the un-loaded time to less than 2 to 4 weeks. The suc-cess of immediate and early loading of implants has been well documented in multiple studies us-ing the latest generation fixtures (Ogawa T., 2003; Zechner W., 2003). Rigid cross-arch stabi-lization has been shown to successfully allow the immediate loading of titanium implants in an edentulous ridge, allowing rapid sequence reha-bilitation of the arch involved. With the combina-tion of the new surface technology and cross-arch stabilization, immediate placement of an implant-supported fixed prosthesis following im-plant placement is now a predictable treatment option (Gapshi R., 2003; Tarnow D., 1997; Sad-owsky S.J., 1997; Harris D., 2002; Chatzistavrou M., 2003).
There has been numerous treatment modalities described for the immediate loading of implants to achieve optimal prosthetic design during the rehabilitation of the edentulous ridge such as the conversion prosthesis (Balshi, 1985), retrofitting an existing complete denture, providing relief in the areas of the implants, by converting it into a provisional restoration using acrylic resin or acrylic resin metal-reinforced frameworks (Zit-maqnn N.U., 1999). Laboratory fabricated transi-tional prosthesis can be processed following the placement of the implants by making a tradition-al impression of the fixtures. Another treatment is a laboratory-processed provisional utilizing a precast framework and processed complete
den-ture that is connected intraorally after implant placement (Rodrigues A.H., 2003).
Creating a provisional prosthesis after the surgi-cal procedure can be difficult and time-consum-ing for both the patient and the clinician because of the extended time in the chair (Rodrigues A.H., 2003).
This report describes the rehabilitation of a com-pletely edentulous patientutilizing a CT-based implant planning with computer-assisted surgical design, simultaneous CAD/CAM fabrication of a surgical template, a flapless surgical placement of the implants, and a prefabricated fixed com-plete denture for an immediately loaded restora-tion according to Nobel Biocare’s Teeth-in-an-Hour™ (Nobel Biocare Goteborg, Sweden) pro-tocol.
This systematic approach to full mouth rehabili-tation reduces the time necessary for an edentu-lous patient to go from severely atrophic alveolar support to implant retained prosthetic restora-tion. These aspects of minimally invasive and simplified surgery, along with reducing the treat-ment time and postsurgical discomfort, are bene-ficial to the patient (Malo P., 2003). and allowing for rehabilitation with the same level of success as in flap surgery (Malo P., 2007).
Using surgical software (NobelGuide; Nobel Biocare AB) and a computerized tomography scan (CT scan), data can be transferred into a 3-dimensional (3-D) implant planning program to allow for accurate planning and placement of im-plants (Marchack, 2005). A surgical template and a fixed acrylic resin implant supported prosthesis are fabricated, ensuring precision of transfer from the virtual to the planned prosthesis, imme-diately after clinical implant placement through a flapless surgery, a prosthesis, manufactured prior to the implant surgery, was inserted.
Case report
A 60-year-old man presented with a mandibular complete denture (Fig. 1). The patient had been edentulous since he was 50 years old. Because of
original article
©
CIC
EDIZIONI
over 10 years of removable complete denture use, the edentulous alveolar ridges have suffered severe resorption. The patient was never com-fortable with the mandiboular prosthesis and complained of ill-fitting mandibular prosthesis. The patient stated that he was interested in fixed prosthetic rehabilitation. The patient had a com-prehensive examination by an oral surgeon and prosthodontist to establish his candidacy for im-plant therapy with immediate loading of the den-tal implants.
Patient selection is critical and may predicate success of the surgery (Sadowsky S.J., 1997; Zit-maqnn N.U., 1999) host factors, implant design, and occlusal loads may all impact osseointegra-tion of the implants (Gapski R., 2003).
The patient was reevaluated to determine and confirm tooth position for aesthetics (Frush J., 1955), phonetics (Rothman, 1961), and appropri-ate vertical dimension (Swerdlow, 1965). For radiographic guide preparation, the patients’ previously worn prosthesis was used, when ade-quate, or a new complete transitional lower den-tures was fabricated.
When a new removable prosthesis was fabricated, an impression was made with an elastomeric im-pression material (polyether, Impregum Penta, 3M Espe, Italy) to obtain the final casts. Maxillo-mandibular relation records, including the making of an interocclusal record and a trial insertion of the tooth arrangement, were accomplished.
Once the appropriate setup was achieved the mandibular arch rehabilitation started. If the fab-ricated transitional complete prosthesis is accept-able to the patient both functionally and aesthet-ically, the practitioner needs to confirm its sta-bility or a reline would be required. It is impera-tive at this stage that both the patient and practi-tioner are satisfied prior to proceeding with the projected immediately loaded fixed prosthesis. This commits both the patient and practitioner to the final restoration; otherwise a new setup should be undertaken.
In this procedure, the transitional denture is du-plicated into clear acrylic for use as a radiograph-ic guide. As with all duplradiograph-ications, confirming the seat of the duplicate radiographic guide is imper-ative. The same denture can also be used as a ra-diographic guide but it is important that it’s not reinforced with metal framework. Six buccal and 3 palatal holes, 1.5 mm wide and 1 mm deep, were made randomly at different levels in the re-movable prosthesis and were filled with a radio-opaque marker (guttapercha; Obtura Spartan, USA) (Fig. 2).
An interocclusal record was made as a radi-ographic index with a rigid vinyl polysiloxane (Zhermack SpA, Italy) at the patient’s-appropri-ate centric relation and occlusal vertical dimen-sion. The patient was prescribed for a mandi-boular computed tomography (CT), using a
dou-original article
Figure 1
Patient with a mandibular complete denture func-tionally inadequate.
Figure 2
Duplicate of transitional prosthesis used as radi-ographic guide with radio-opaque markers ran-domly positioned at different levels.
©
CIC
EDIZIONI
ble-scan technique (van Steenberghe D., 2002) which allowed views of different objects at dif-ferent densities. The first scan was of the patient with the interim denture, which included the ra-diopaque markers and the interocclusal record. The second scan was of the denture only with the same orientation as in the mouth. The CT data was converted into a file format compatible with the planning program, having the two sets of scans superimposed upon each other. One scan was of the osseous tissues and the other of the complete denture, which showed the position of the planned denture teeth in relation to the bone. The reformatted data was returned to the surgical and restorative team to determine and plan for the implant positions. A 3-dimensional implant planning software program the Procera Software Planning program (Nobel Biocare AS), follow-ing the Procera Cad-Design procedure, allowed the clinicians to evaluate the osseous tissues in relation to the ideal prosthetic position of the denture teeth (Fig. 3). From this information, the
sizes and positions of the dental implants were digitally evaluated and virtually placed (Ver-streken K., 1996) (Fig. 4). The surgical place-ment data was transferred to a milling center (Procera; Nobel Biocare) that fabricated and de-livered the surgical template (Nobel Guide, No-bel Biocare, AB) (Fig. 5) to guide the surgeon as to the precise positions of each dental implant (Parel S.M., 1991).
original article
Figure 3
Procera Software Planning Program allows for prosthetic guided implant positioning.
Figure 5
CAD/CAM manufactured surgical template.
Figure 4
A 3-dimensional Procera Cad-design of surgical template after implant virtual positioning.
©
CIC
EDIZIONI
original article
Dental laboratory
The laboratory process consisted of fabricating a working cast connecting implant replica to the surgical stent and mounting the cast onto an ar-ticulator with the opposing cast using the origi-nal interocclusal record and radiographic guide. A new interocclusal record was made between the surgical template and the opposing arch on the articulator to facilitate positioning and to transfer the centric relation and occlusal vertical dimension information to the patient during sur-gery. Therefore an acrylic resin fixed complete denture reinforced with metal frame work to guarantee cross-arch stabilization of implants was fabricated.
Surgical procedure
The surgical template was oriented in the patient using a surgical index fitted to the opposing arch (Fig. 6) and stabilized with anchor pins (Nobel Biocare AB). After placement of the surgical tem-plate, flapless implant surgery was performed, fol-lowing the manufacturer’s instructions, using a drill protocol (NobelGuide; Nobel Biocare AB). The surgical procedure was performed according to the Teeth-in-an-Hour concept (Nobel Biocare AB). The flapless surgery was performed under local anesthetic (Rocci A., 2003). The surgical template was inserted and positioned with the cen-tric relation interocclusal record. While the patient was closed into the interocclusal record, friction-fitted horizontal stabilization pins (Procera; Nobel Biocare) were used to help maintain the accurate position of the surgical template during the surgi-cal procedure. The three horizontal stabilization pins were placed through the surgical template in a preplanned horizontal direction into the osseous tissues.
The l.5-mm twist drill was used to create reten-tive holes for the stabilization pins. The pins were positioned, securing the surgical template,
and the patient was allowed to open his mouth. The first osteotomy site was prepared, adjacent to the most anterior implant site, using the appro-priate drilling guides and twist drills. The pre-planned length and diameter of the implant was placed using the implant guide. After insertion of the implant (Nobelspeedy Groovy®, Nobel
Bio-care AB) with an oxidized surface (TiUnite; No-bel Biocare AS) a template abutment was insert-ed, which connected the surgical template to the placed implant, providing additional stability to the template. The next implant was inserted in the opposite side of the arch, also adjacent to the most anterior implant to guarantee the cross sta-bilization of the surgical guide. After the implant was placed, a second template abutment was in-serted. The three horizontal stabilization pins, and the two template abutments, ensured the sur-gical template’s stability and accurate position. The remaining implants were placed, using the same drilling guides and twist drills (Fig. 7). Furthermore, there is consensus on the impor-tance of achieving adequate primary stability by placing implants at insertion torque values of 35 to 45 Ncm (Malo P., 2003). However, in more dense bone (classes D1 and 02, Lekholm and Zarb index), insertion torque should not exceed 50 Ncm to avoid bone overcompression and in-crease the risk of crestal bone loss. The minimal-ly-invasive approach of Nobel Guide surgical procedure allowed no bleeding or pain perform-ing surgery, and a healthy aspect of soft tissue af-ter implant placement (Fig. 8).
Figure 6
Surgical template oriented in the mouth using a surgical index fitted to the opposing arch and sta-bilized with anchor pins.
©
CIC
EDIZIONI
original article
Prosthetic procedure
After all implants were placed, the pre-fabricated temporary prosthesis framework was inserted (Fig. 9). Vertically adjustable abutments (Nobel Biocare AB) were used, which allowed for dis-crepancies in the z-axis. The adjustable abutment is an interlocking cylinder sleeve with two pieces that slide within one another. The sliding cylinders of the abutment allow for slight variations in the
z-axis position of the implant, allowing a passively fitting framework. Once the prosthesis was insert-ed, postoperative radiographs were made to con-firm the fit of the prosthesis (Fig. 10a-b-c). The re-taining screws were torqued at 35 Ncm into place, the occlusion was evaluated and adjusted to have simultaneous centric relation contact and a canine protected occlusal scheme (van Steenberghe D., 2002). In addition, provisional prostheses with narrow occlusal platforms, flat cusps, and light oc-clusal contacts to minimize the lateral forces are recommended (Rocci A., 2003) (Morton D., 2004) (Rangert B.R., 1997). The access holes were sealed with a cotton pellet and gutta-percha.
After surgery follow-up
Following the procedure, the patient was dis-charged home. The patients was enrolled in an implant maintenance program (Table I) and in-structed to eat a soft diet for 2 months. To be classified as surviving, the implants were re-quired to fulfill the following criteria: clinical stability, patient reported function without any discomfort, absence of suppuration, infection, or radiolucent areas around the implants at 10 days and 2-4 months, post-surgically.
Figure 7
8 fixtures positioned and seated correctly on the sleeve of surgical template.
Figure 8
Minimally invasive guided surgery results in min-imal postsurgical trauma of periimplant soft tis-sue.
Figure 9
The pre-fabricated temporary prosthesis frame-work passively fitted on implants.
©
CIC
EDIZIONI
original article
Periapical radiographs were made at implant in-sertion and after 4 months. A conventional radi-ograph holder (Rinn RX Holder; Dentsply, Italy) was used, and its position was manually adjusted for an estimated orthogonal position of the film. The reference point for the reading was the im-plant platform (the horizontal interface between the implant and the abutment), and marginal bone remodeling was defined as the difference in marginal bone level relative to the bone level at time of surgery.
After 3 months, if the implants were judged sta-ble (Fig. 11) a conventional protocol was fol-lowed to take an impression for manufacturing the definitive prosthesis. An impression using a reversible hydrocolloid was made for a study cast poured in a gypsum stone. This study cast was used to fabricate an open-top custom tray from a light-cured resin. At a subsequent appointment
impression copings (Nobel Biocare 29073) were torqued (15 Ncm) to the implant. If the impres-sion copings seating could not be confirmed by visual inspection, a radiograph was taken to ver-ify the seating prior to impression taking. A stone-impression is made using an impression plaster (Snow White Plaster 2, Kerr) to obtain rigid splinting of impression copings and accu-rate reproduction of the soft tissue anatomy for the fabrication of the master cast (Fig. 12). Lab-oratory analogs (Nobel Biocare 29108) were at-tached to the impression copings, and a soft tis-sue and stone master cast was fabricated. The es-thetics and phonetics of the definitive prosthesis was dictated by the interim denture. The full bridge was produced using CAD/CAM technolo-gy following Procera Zirconia Implant Bridge protocol. The full bridge framework was mod-eled with a wax-up procedure using an acrylic
Figure 10
Postoperative radiographs were made to confirm the fit of the prosthesis, with vertically adjustable abut-ments seated on implant platforms.
A B C
©
CIC
EDIZIONI
INTERNAZIONALI
original article
low shrinkage resin (Leocryl, Leone spa, Italy) (Fig. 13). The CAD design of the framework (Fig. 14) was obtained by tactile scan and related data was sent to the milling Center to produce de-finitive bridge from one blank of zirconia. Pro-cera Bridge Zirconia has a very high flexural strength and fracture toughness, these make
zir-conia very resistant to masticatory forces, still with mainteined exact precision of fit (Sierraalta M., 2006) (Fig. 15, 16).
The biocompatibility of zirconia improve soft tis-sue healing and guarantees a soft tistis-sue seal around the neck of the implant (Fig. 17). The zirconia framework was prepared for
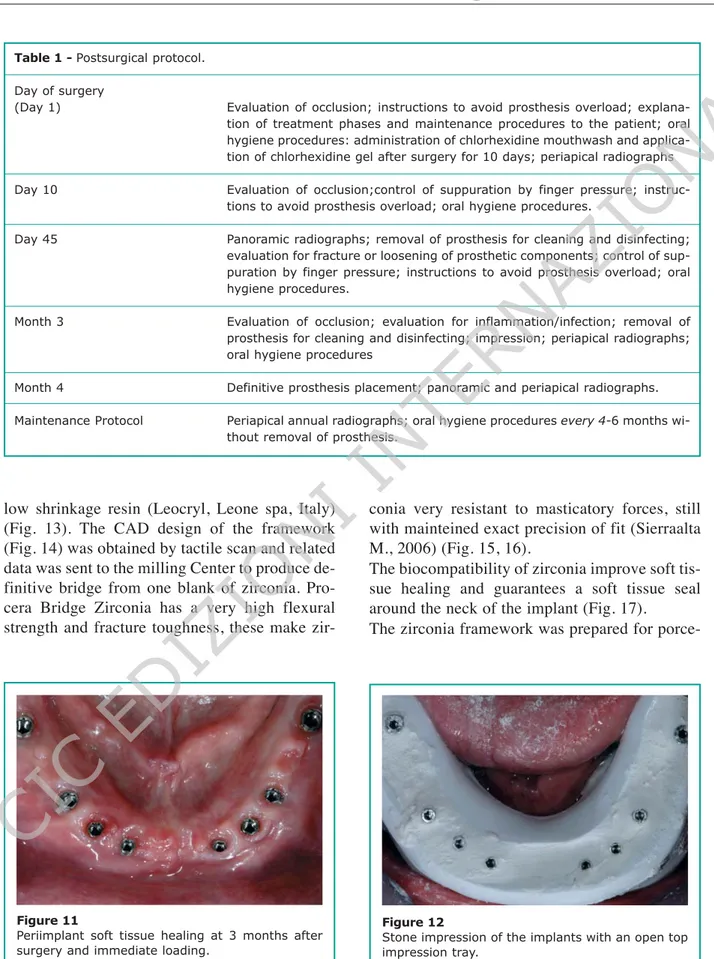
porce-Table 1 - Postsurgical protocol.
Day of surgery
(Day 1) Evaluation of occlusion; instructions to avoid prosthesis overload;
explana-tion of treatment phases and maintenance procedures to the patient; oral hygiene procedures: administration of chlorhexidine mouthwash and applica-tion of chlorhexidine gel after surgery for 10 days; periapical radiographs
Day 10 Evaluation of occlusion;control of suppuration by finger pressure;
instruc-tions to avoid prosthesis overload; oral hygiene procedures.
Day 45 Panoramic radiographs; removal of prosthesis for cleaning and disinfecting;
evaluation for fracture or loosening of prosthetic components; control of sup-puration by finger pressure; instructions to avoid prosthesis overload; oral hygiene procedures.
Month 3 Evaluation of occlusion; evaluation for inflammation/infection; removal of
prosthesis for cleaning and disinfecting; impression; periapical radiographs; oral hygiene procedures
Month 4 Definitive prosthesis placement; panoramic and periapical radiographs.
Maintenance Protocol Periapical annual radiographs; oral hygiene procedures every 4-6 months
wi-thout removal of prosthesis.
Figure 11
Periimplant soft tissue healing at 3 months after surgery and immediate loading.
Figure 12
Stone impression of the implants with an open top impression tray.
©
CIC
EDIZIONI
original article
lain application and the definitive prosthesis was seated in the mouth and torqued with special zir-conia screws at 35 Ncm (Fig. 18a-b-c).
Discussion
The Teeth-in-an-Hour protocol is a unique solu-tion made possible by the Procera System. With the aid of the CT scans and a virtual planning software, a custom fabricated precision drill
Figure 14
The CAD design of the framework obtained by tac-tile scan.
Figure 15
Procera Zirconia Implant Bridge made with CAD/ CAM tecnology.
Figure 13
The full bridge framework was modeled with a wax-up procedure using an acrylic low shrinkage resin.
Figure 16
High precision and accuracy of fitting on implant platform of Zirconia implant Bridge.
Figure 17
Full arch Zirconia framework try-in.
©
CIC
EDIZIONI
original article
guide and a pre-manufactured prosthesis can be made before surgery. During the clinical and dig-ital planning stage most treatment decisions are made with regard to prosthesis design and im-plant placement. The execution of imim-plant place-ment is performed with a flapless procedure that results in minimal surgical intervention. This re-sults in a short and non-traumatic surgery with a minimum of postoperative complications, allow-ing the patient to leave the chair with a fixed prosthesis. The patient was elated with the short surgery time and remarked postoperatively at the uneventful short recovery with minimal discom-fort. Flapless surgery means less chance of swelling, less pain, and faster initial healing times. Surgical complications can include plan-ning and placement of the implants too deeply in-to the osseous tissues, making it difficult in-to seat the prosthesis. It is critical to ensure the osseous tissue is cleared around the placed implant, al-lowing the abutment to be completely seated.
This procedure may be contraindicated for pa-tients with limited oral opening. The surgical ar-mamentarium is longer than traditional drill kits and access may be difficult.
Utilizing the latest scanning, CAD/CAM and manufacturing technologies the dental team is able to develop individualized dental restoration with high accuracy and precision of fit (Fig. 19a-b-c). This new protocol simplifies the operative procedure of total arch reconstruction and allows transition from severe ridge resorption and fail-ing conventional dentures to an implant fixed de-finitive prosthesis within 4 months (Fig. 20).
Acknowledgement
The authors wish to thank Mr. Alberto Bonaca, Dental technician, Perugia (Italy), for his preci-sion and accuracy in performing all the laborato-ry phases of the treatment.
Figure 18
Completed Procera Zirconia Implant Bridge interoc-clusal lateral and frontal view: ideal implant position-ing respectposition-ing volume emergence profile of definitive prosthesis. A B C
©
CIC
EDIZIONI
INTERNAZIONALI
original article
Figure 19
Periapical radiographs made to confirm the fit and the accuracy of definitive Procera Zirconia Implant Bridge prosthesi. A B C Figure 20 Final radiograph.
©
CIC
EDIZIONI
INTERNAZIONALI
original article
References
11. Adell R, LU. A 15 year study of osseointegrated im-plants in the treatment of edentulous jaw. Int J Oral Surg 1981; (10): 387-416.
12. Balshi T. The Biotes conversion prosthesis: a provi-sional fixed prosthesis supported by osseointegrated titanum fixtures for restoration of edentulous jaw. Quintessence Int 1985; 16: 667-677.
13. Branemark P. Osseointegration and its experimental background. J Prosthet Dent 1983; 50: 339-410. 14. Campelo LD, C.J. Flapless implant surgery: a
10-year-clinical retrospective analysis. Int J Oral Max-illofac Impl 2002;(17): 271-276.
15. Chatzistavrou M, F.D. Immediate loading of dental implants in partially edentulous patients: a clinical report. J Prosthodont 2003; 12: 26-29.
16. Frush J, F.R. Introduction to dentogenic restoration. J Prosthet Dent 1955; 5: 586-95.
17. Gapshi R, W.H. Critical review of immediate im-plant loading. Clin Oral Imim-plants Res 2003; 14: 512-527.
18. Gapski R, W.H. Critical review of immediate im-plant loading. Clin Oral Imim-plants Res 2003; 14: 512-527.
19. Glauser R, L.A. Immediate occlusal loading of Branemark MkIV TiUnite implants placed predomi-nantely in soft bone: 1-year results of a prospective, clinical study. Clin Impl Dent ReI Res 2003; (1): 47-56.
10. Harris D, B.D. EAO guidelines of the use of diag-nostic imaging in implant dentistry. A consensus workshop organized by the European Association for Osseointegration in Trinity College Dublin. Clin Oral Implant Res 2002; (3): 566-570.
11. Jemt T, B.T. Precision of CNC-milled titanium Framework for implant treatment in the edentulous jaw. Int J Prosthodont 1999; 209-15.
12. Jemt T. Three-dimensional distortion of gold alloy castings and welded titanium frameworks. Measure-ments of the precision of fit between completed im-plant prosthesis and the master cast in routine eden-tulous situations. J Oral Rehabil 1995; 22: 557-64. 13. Malo P, F. B. Immediate and early function of
Bra-nemark System implants placed in the esthetic zone: a 1-year prospective clinical multicenter study. Clin Implant Dent Relat Res 2003; 5 (1): 37-46.
14. Malo P, N.M. The use of computer-guide flap less implant surgery and four implants placed in imme-diate function to support a fixed denture: prelimina-ry results after a mean follow-up period of thirteen months. J Prosthet Dent 2007; 97: 526-534.
15. Marchack C. An imediately loaded CAD/CAM-gui-ded definitive prosthesis: A clinical report. J Prosthet Dent 2005; 93: 8-12.
16. Marchack C. What can we offer patients with to-day’s advancements dental matorials? J Calif Dent Assoc 2003; 31: 339-40.
17. Marx RE, S.T. Severely resorbed mandible: predic-table reconstruction with soft tissue matrix expan-sion (tent pole) grafts. J Oral Maxillofac Surg 2002; 60: 877-878.
18. Morton D, J.R. Immediate restoration and loading of dental implants: clinical considerations and proto-cols. Int J Oral Maxillofac Implants 2004; (19), Suppl:103-108.
19. Ogawa T., N.I. Different bone integration profiles of turned and acid-etched implants associated with mo-dulated expression of extracellular matrix genes. Int J Oral Maxillofac Implants 2003; 18: 200-210. 20. Parel SM, F.J. The use and fabrication of a
self-retai-ning surgical guide for controlled implant place-ment: a technical note. Int J Oral Maxillofac Im-plants 1991; 6: 207-210.
21. Rangert BR., S. R. Load factor control for implants in the posterior partially edentulous segment. Int J Oral Maxillofac Implants 1997; (12): 360-370. 22. Rocci A., M.M. lmmediate loading in the maxilla
using flapless surgery, implants placed in predeter-mined positions, and prefabricated provisional resto-rations. A retrospective 3-year clinical study. Clin Implant. Dent Relat Res 2003; (5): 29-36.
23. Rodrigues AH, M. S. Laboratory processed acrylic resin provisional restoration with cast metal sub-structure for immediately loaded implants. J Prosthet Dent 2003; 90: 600-4. .
24. Rothman R. Phonetic considerations in denture prosthesis. J Prostet Dent 1961; (11): 214-23. 25. Sadowsky SJ. The implant supported prosthesis for
the edentulous arch: design considerations. J Pros-thet Dent 1997; 8: 28-33.
26. Sierraalta M, R.M. Load to fracture of Procera Zir-conia Bridges. J Dental Res 2006; special issue A. 27. Swerdlow, H. Vertical dimension literature review. J
Prosthet Dent 1965; (15): 241·7.
28. Tarnow D, E.S. Immediate loading of threaded im-plants at stage I surgery in edentulous arches: ten consecutive case reports with 1-5 year follow-up. Int J Oral Maxillofac Implants 1997; 12: 319-324. 29. van Steenberghe D, N.I. A custom template and
de-finitive prosthesis allowing immediate implant loa-ding in the maxilla: a clinical report. Int J Oral Maxillofac Implants 2002; 17: 663-670.
30. Verstreken K, V.C. Computer assisted planning of oral implant surgery. A three-dintensional approach. Int J Oral Maxillofac Implants 1996;11: 806-810.
©
CIC
EDIZIONI
original article
31. Zechner W, T.S. Osseous healing characteristics or three implant types. Clin Oral Implants Res 2003; 14: 150-157.
32. Zitmaqnn NU, M.C. Treatment plan for restoring the
Edentulous maxilla with implant supported restorati-ons; removable overdentures versus fixed partial denture design. J Prosthet Dent 1999; 82 (1): 188-196.
Correspondence:
Dott. Alessandro Pozzi Viale Liegi 44 00198 Rome E-mail: [email protected] Website: www.studioalessandropozzi.com